

One Mac can power multiple iMessage lines at the same time. Each macOS user profile is a fully isolated workspace with its own Apple ID, its own Messages app, and its own copy of the iMessage Sync app - so every profile behaves like a separate Mac.
- Each profile connects one Apple ID and one phone number to one of your sub-accounts.
- Thanks to macOS Fast User Switching, all profiles stay logged in and their sync apps keep running in the background - even while you work in a different profile.
- This works on both a physical Mac and a Cloud Mac. For a Cloud Mac, you need a dedicated machine - shared instances won’t work for multiple profiles.
Why Use Multiple Mac Profiles?
Normally, one Mac = one iMessage line, because the Messages app can only be signed into a single Apple ID per user account. By creating additional macOS user profiles, you get around this limit without buying more hardware:- One machine, many lines: Connect a separate iMessage number for each client, brand, or team member.
- True isolation: Each profile has its own Apple ID, message history, and sync app - nothing overlaps.
- Runs in parallel: All profiles send and receive messages simultaneously; you don’t have to log out of one to use another.
- Cost effective: A single (Cloud) Mac replaces several dedicated machines.
Each connected line appears as its own instance in your CRM. See Multiple Instances for how messages are routed between them, and Number Selection for the
{IM#N} override syntax.What You Need Before Starting
- A Mac (physical or Cloud Mac) with an administrator account. If you rent a Cloud Mac, it must be a dedicated machine - you need full admin access and the machine’s full resources to create profiles and run them in parallel
- One Apple ID per line you want to connect, each with its own phone number and an iPhone set up per our Full Setup guide
- Enough memory: plan for roughly 2 GB of RAM per extra profile on top of what macOS itself needs
Step 1: Create a New Mac Profile
Repeat these steps once for every additional iMessage line you want to run:1
Click the Apple menu () in the top-left corner of the screen and choose System Settings….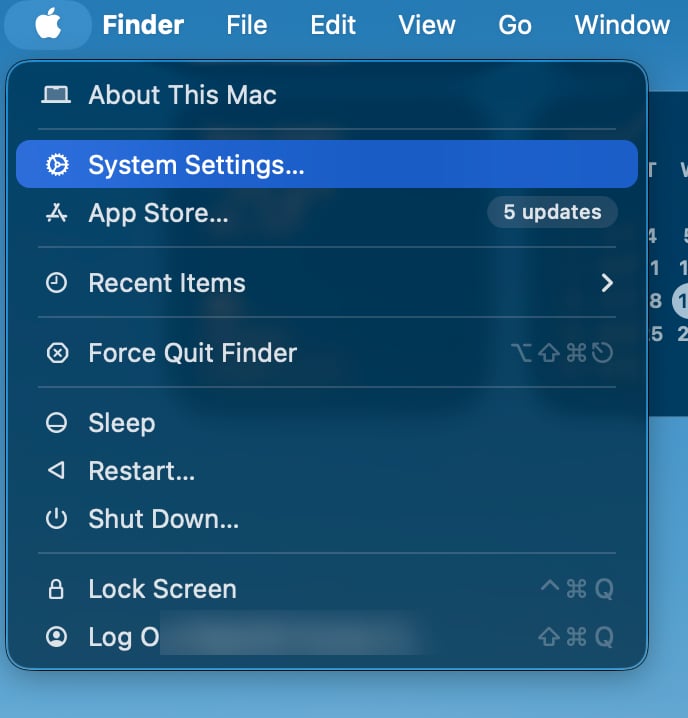
2
In the sidebar, scroll down and select Users & Groups. You’ll see the list of existing profiles on this Mac.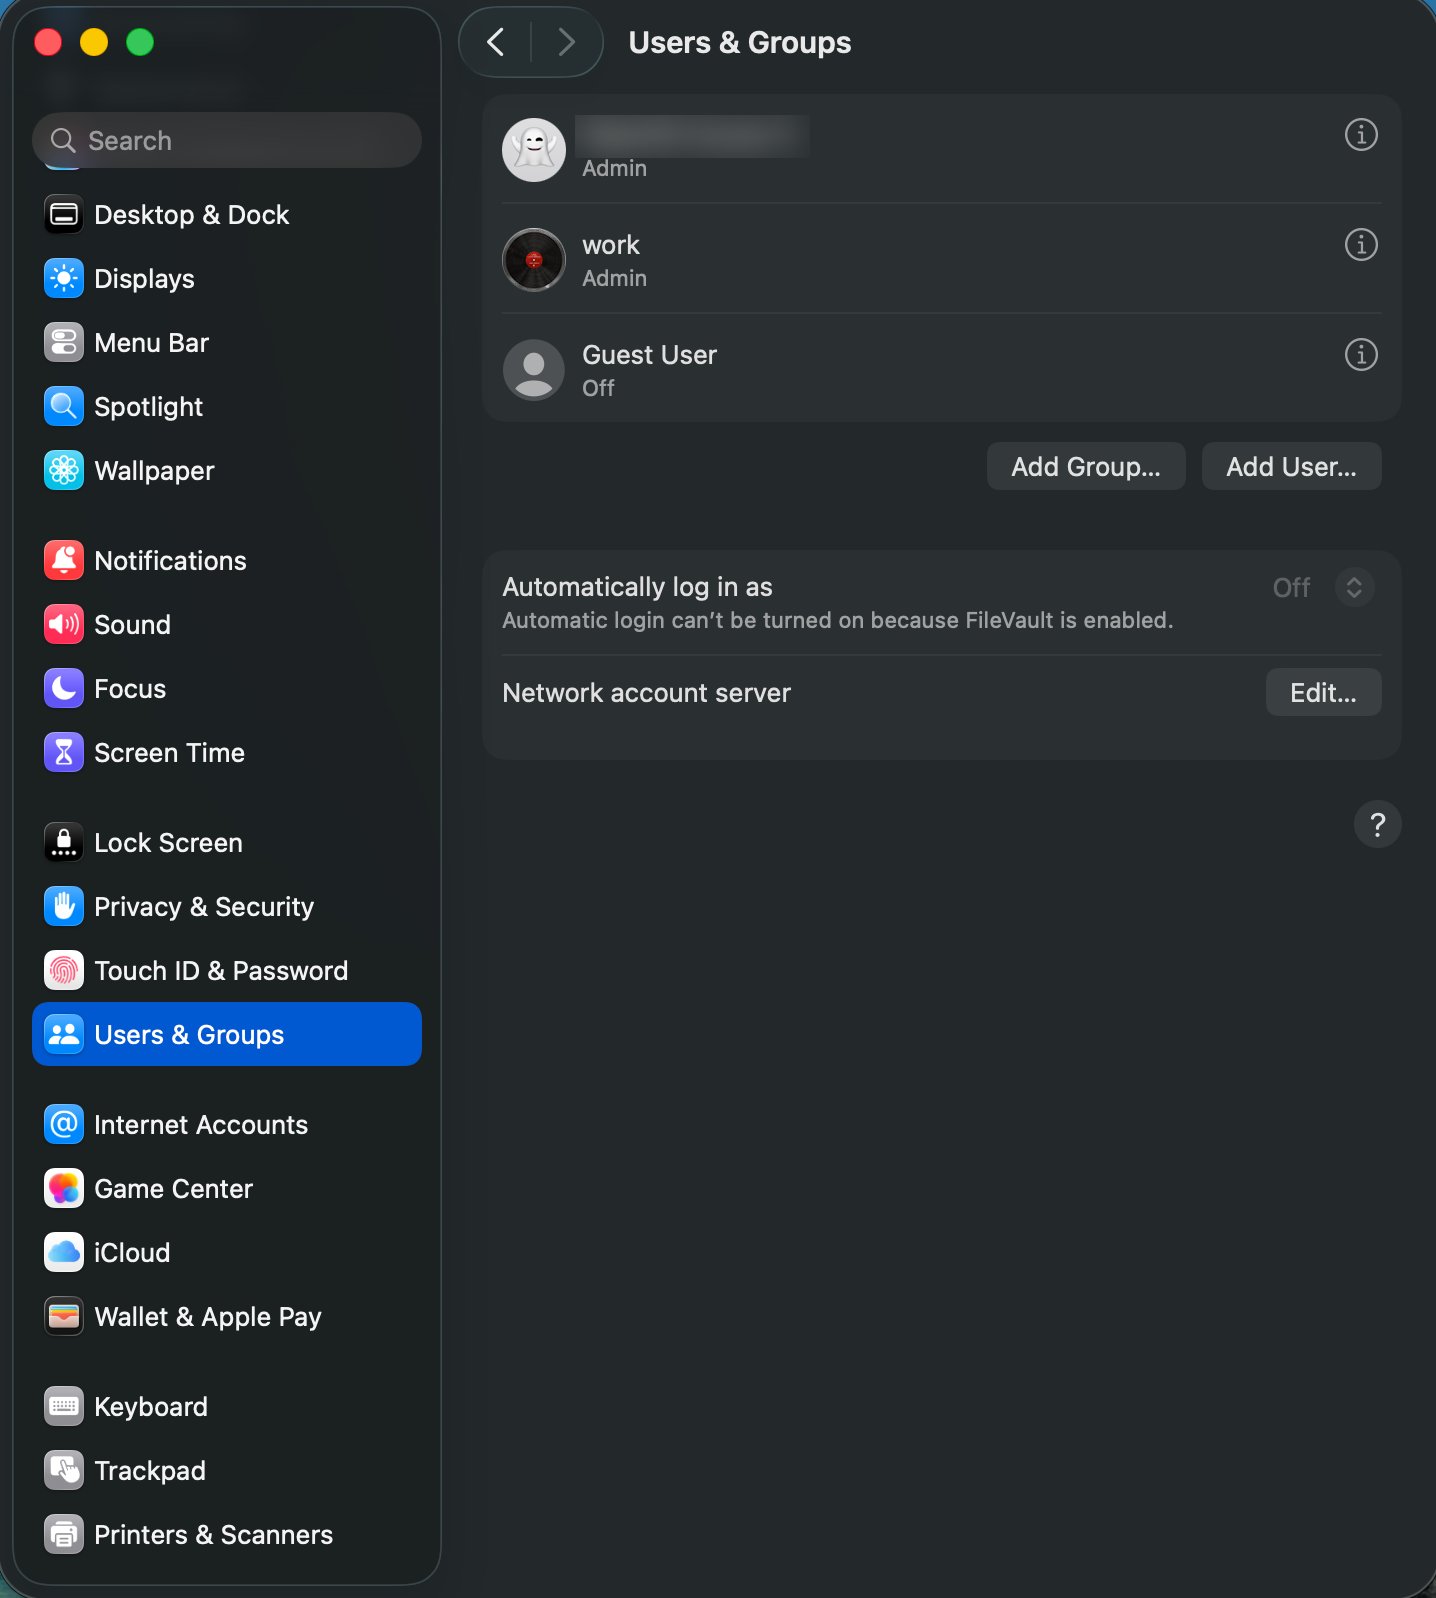
3
Click Add User…. macOS will ask you to confirm with your admin password - enter it and click Unlock.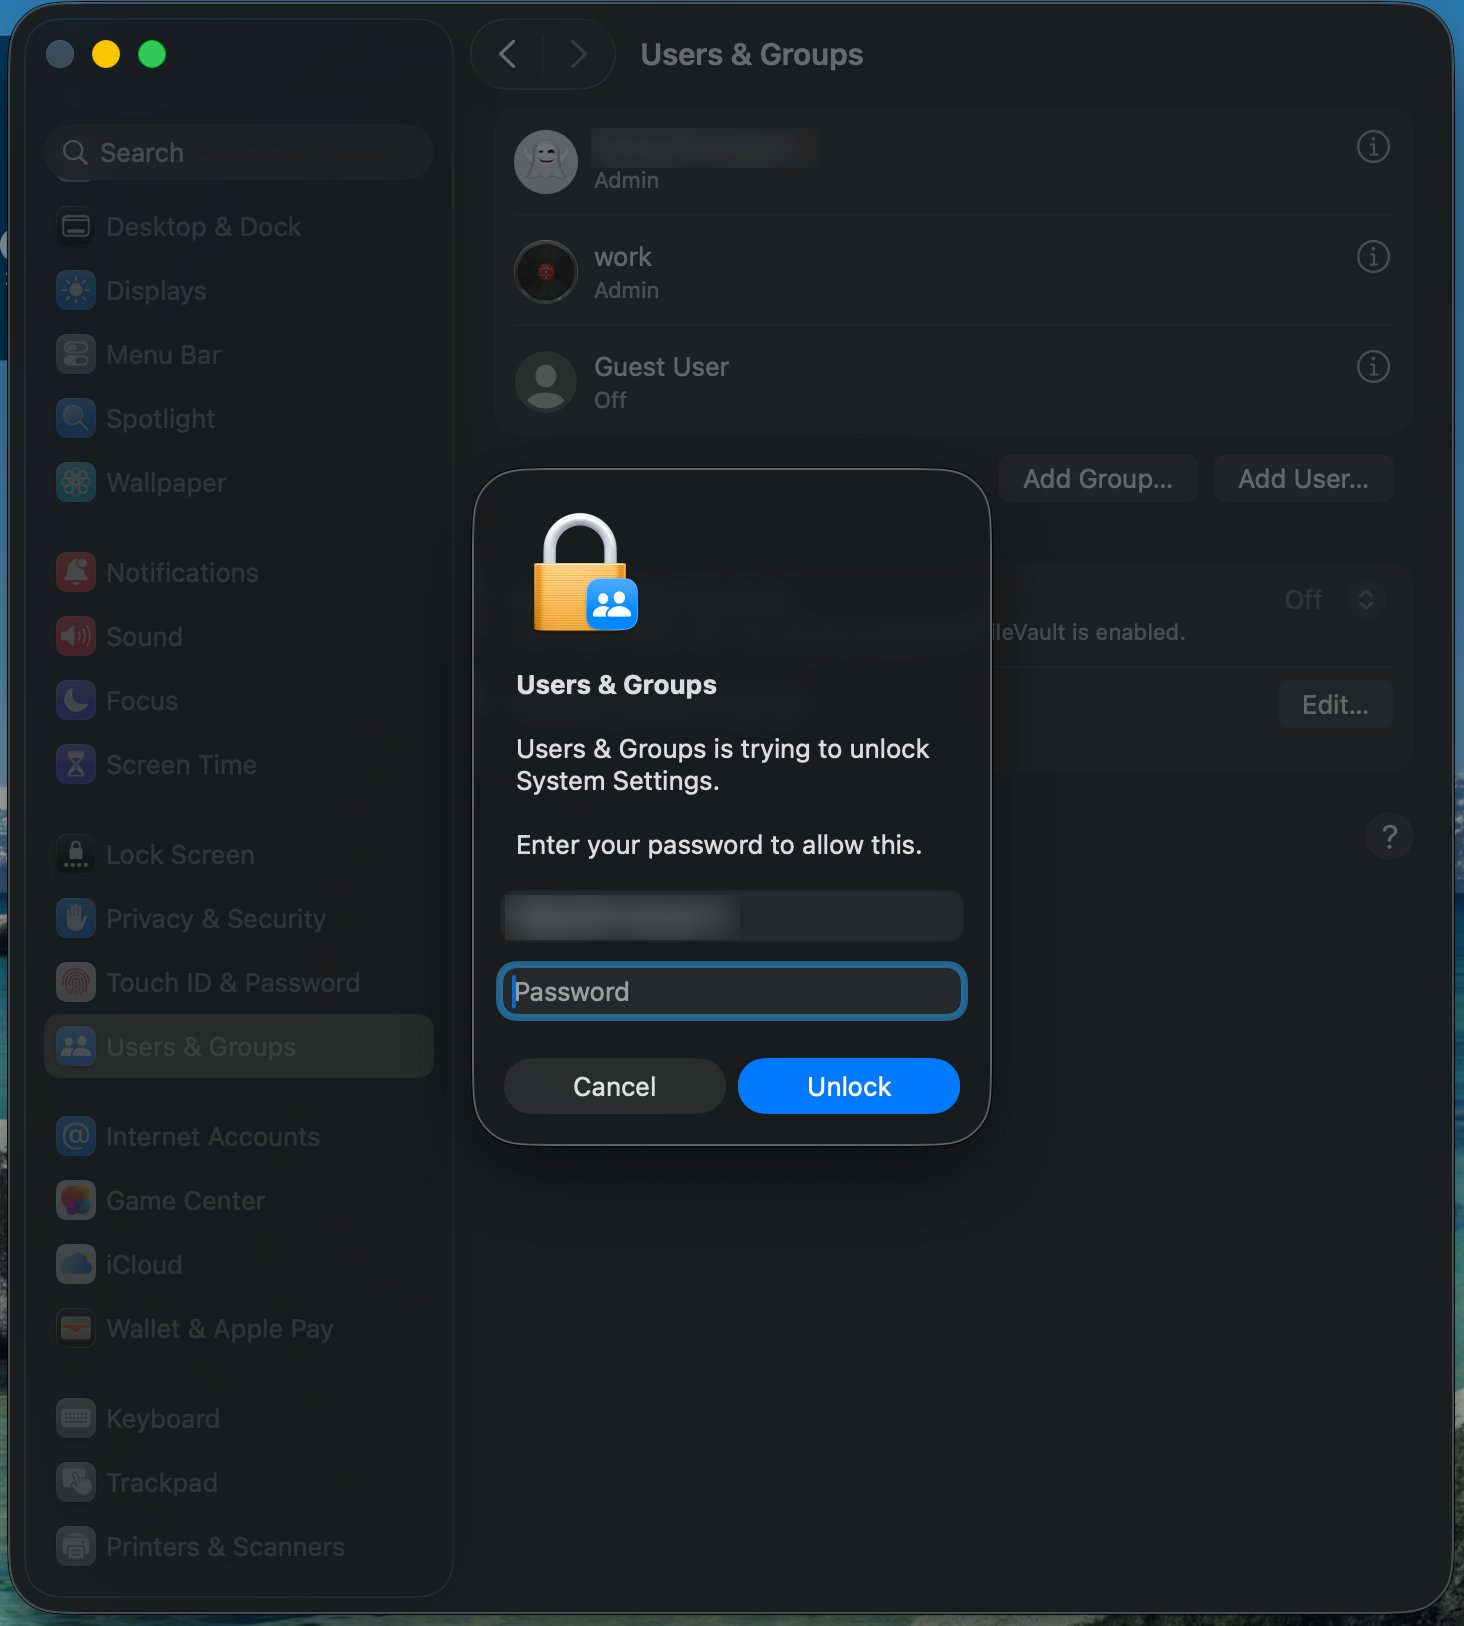
4
In the new user form, set New User to Standard. Admin rights are not required for the sync app to run.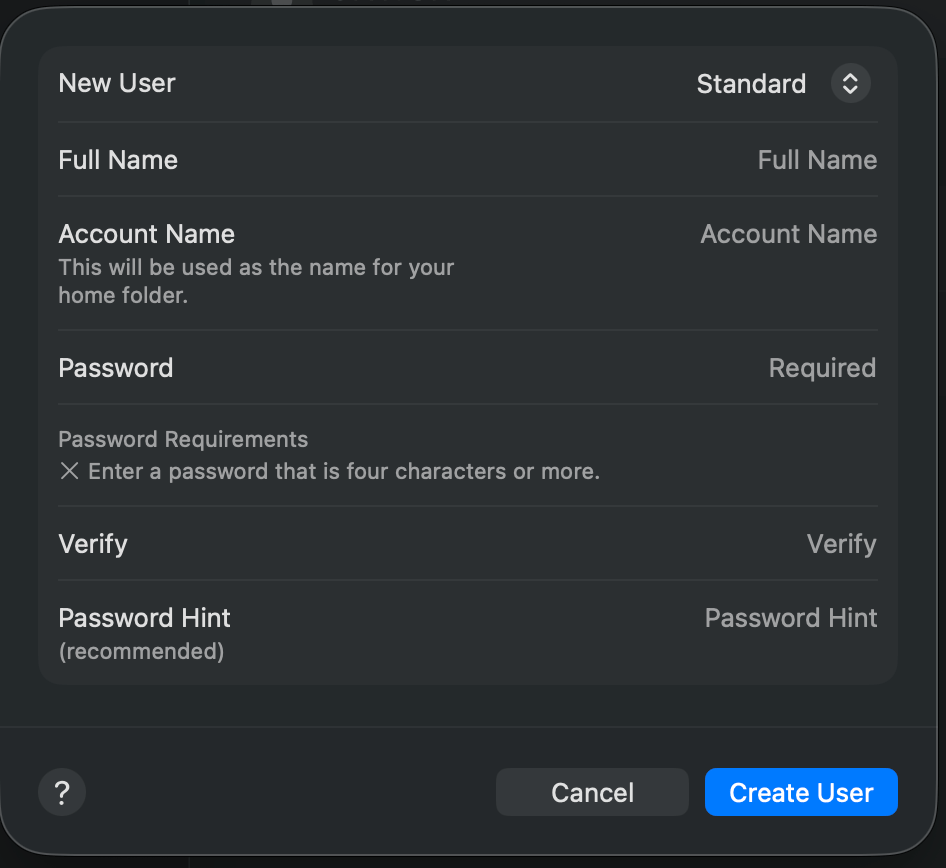
5
Fill in the Full Name with a clear name that matches the line it will run - for example
Client-A-iMessage or Sales-Line-2. The Account Name is filled in automatically.6
Set a password you’ll remember (you’ll need it every time you switch into this profile), add an optional hint, and click Create User.
On older versions of macOS (Monterey and earlier), you’ll find this under System Preferences → Users & Groups, then click the + button to add a user.
Step 2: Turn On Fast User Switching
Fast User Switching lets you jump between profiles from the menu bar without logging anyone out - which is exactly what keeps all your sync apps running in parallel.1
Click the Apple menu () in the top-left corner of the screen and choose System Settings….
2
In the sidebar, select Menu Bar and scroll down to Fast User Switching.
On older versions of macOS this option lives under Control Center instead of Menu Bar.
3
Enable the Fast User Switching checkbox and set its style to your preference - Icon, full name, or account name.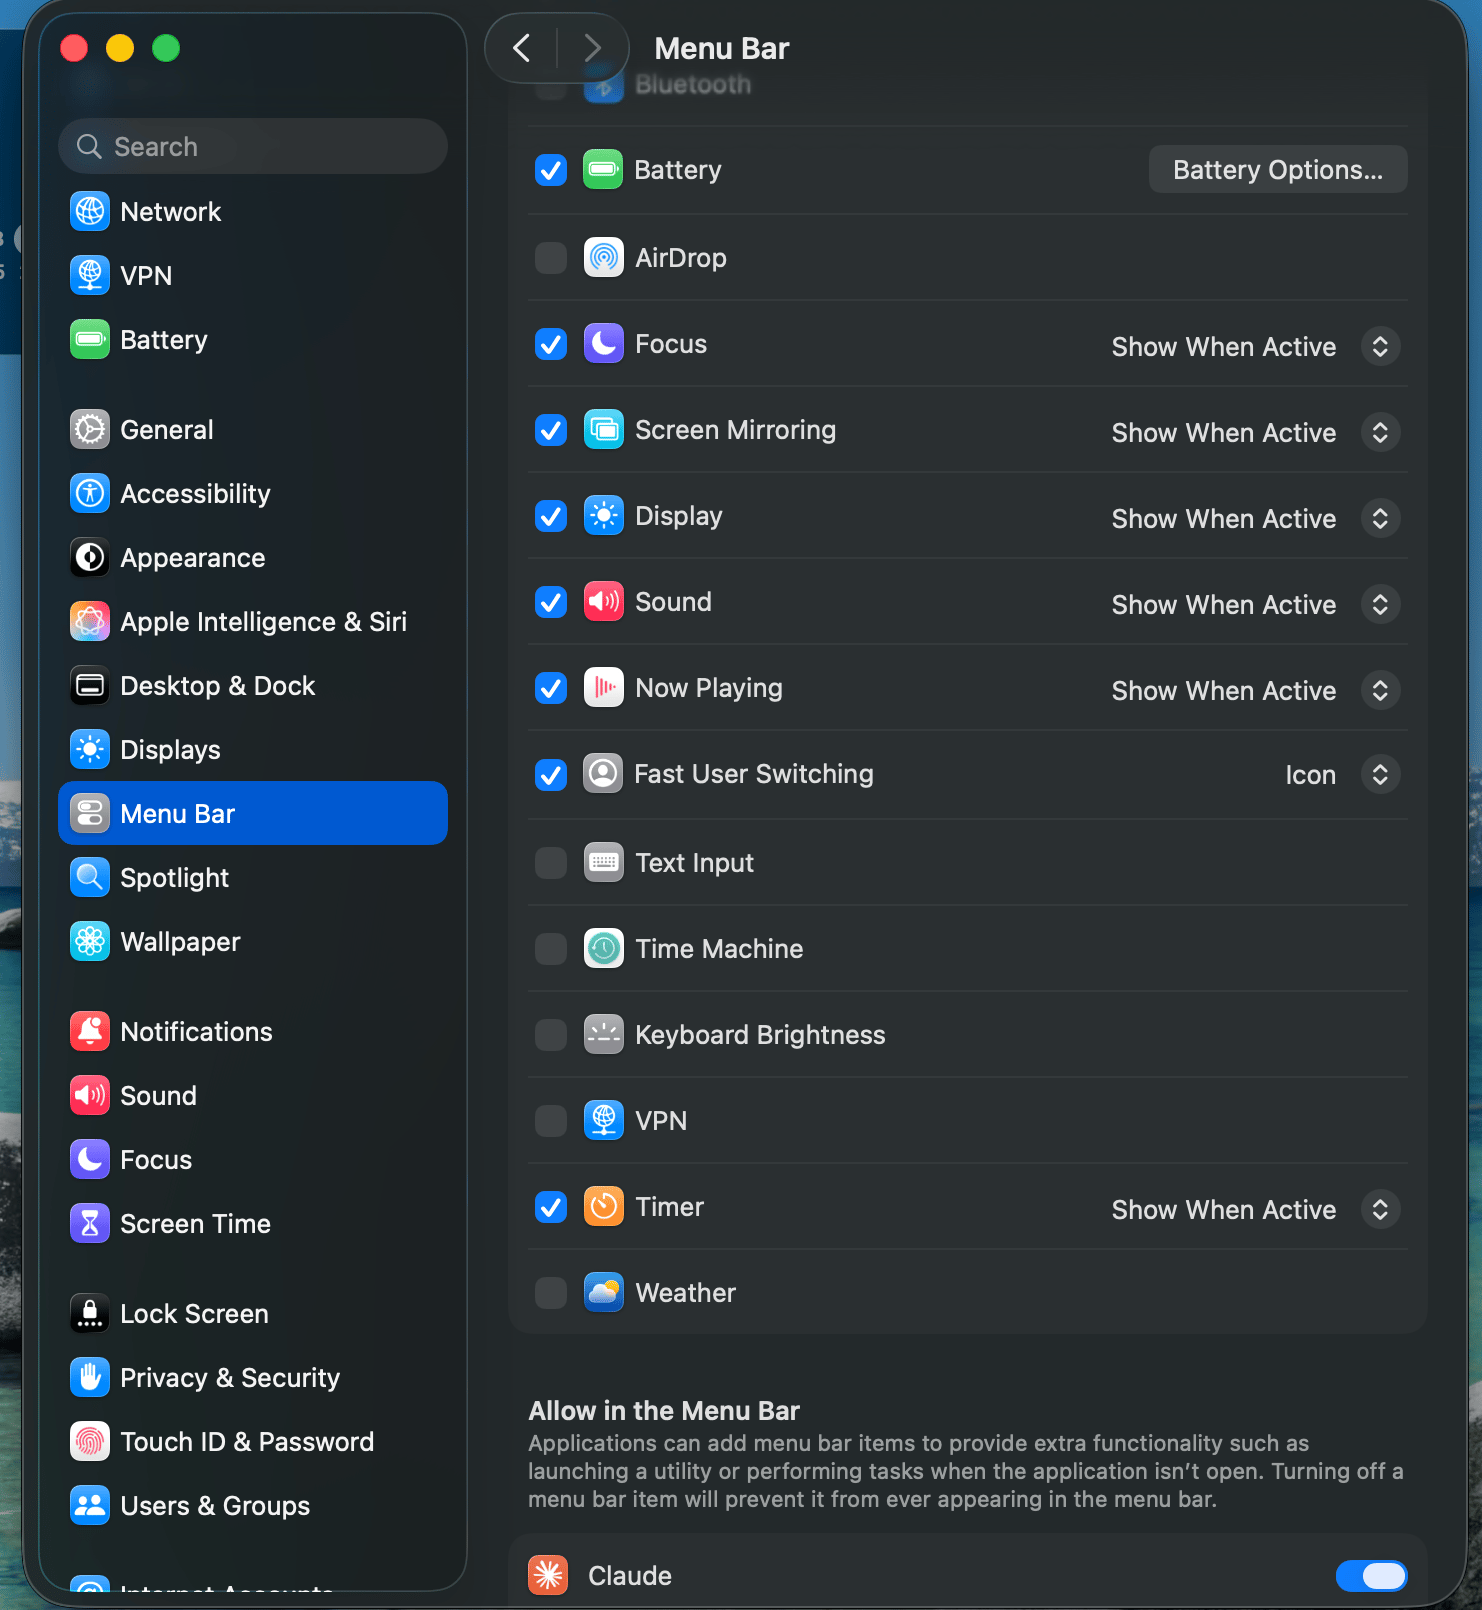
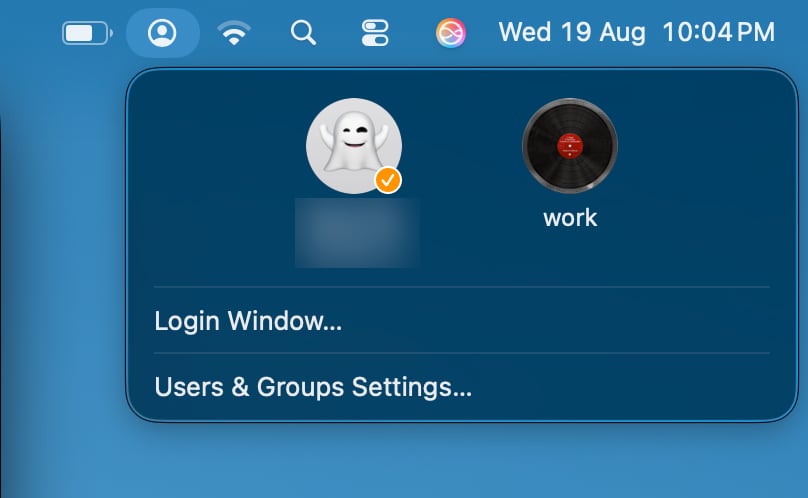
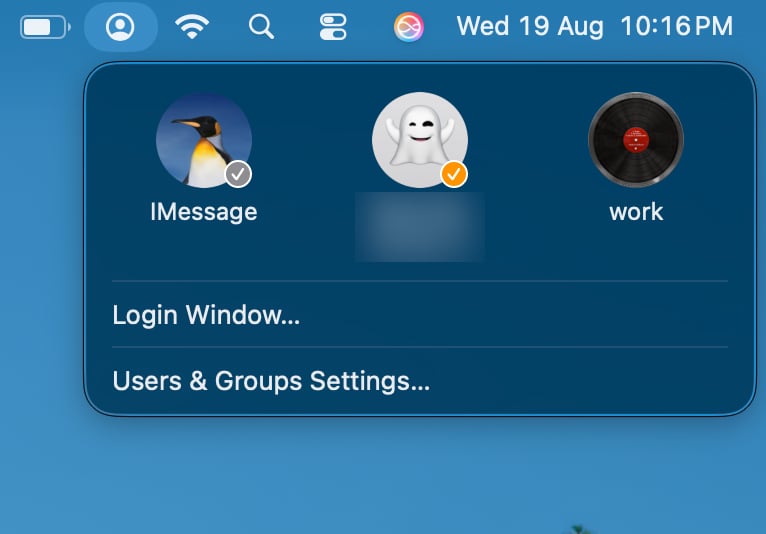
You’ll now see a user icon (or your account name) in the top-right menu bar. Clicking it lists every profile on the Mac - that’s your switcher.
Step 3: Set Up Each Profile
Now switch into each new profile and set it up like a fresh Mac. The first time you log into a new profile, macOS runs a short setup assistant - that’s where you sign in with the Apple ID for this line. Inside each profile:1
Click the Fast User Switching icon in the menu bar and select the new profile, then enter its password on the login screen.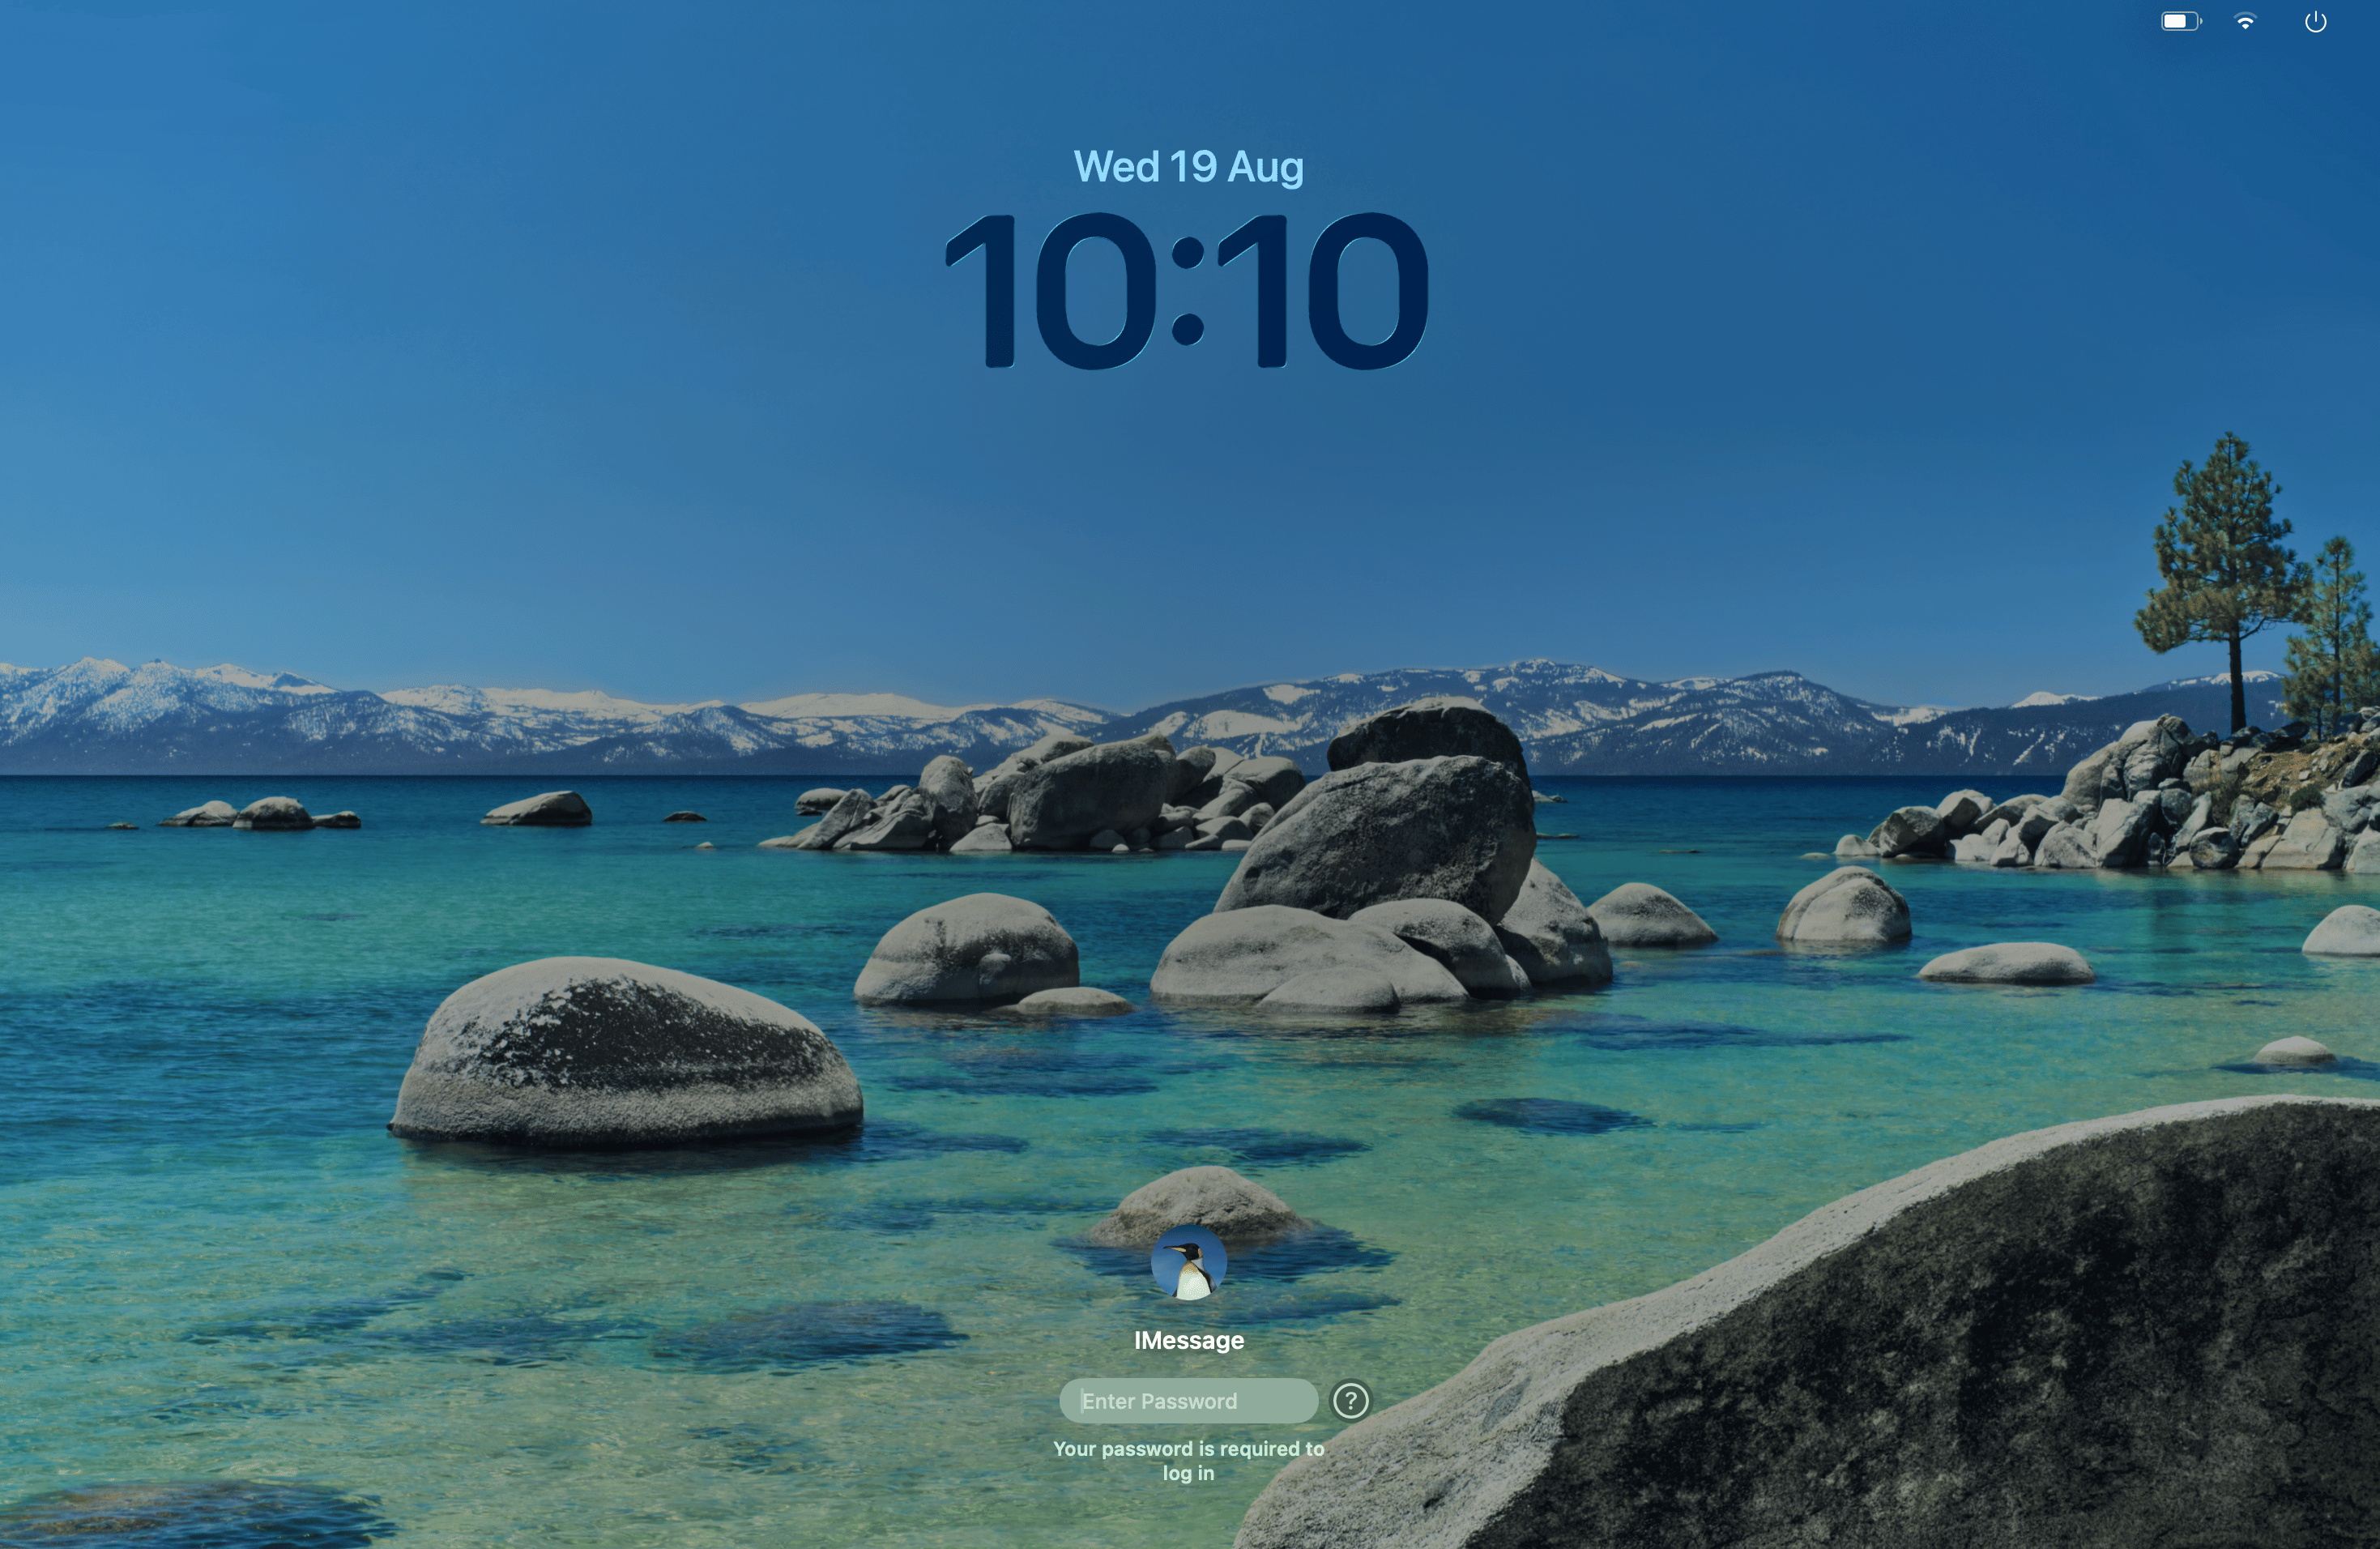
2
On the Accessibility screen, click Not Now (you can always adjust these later in System Settings).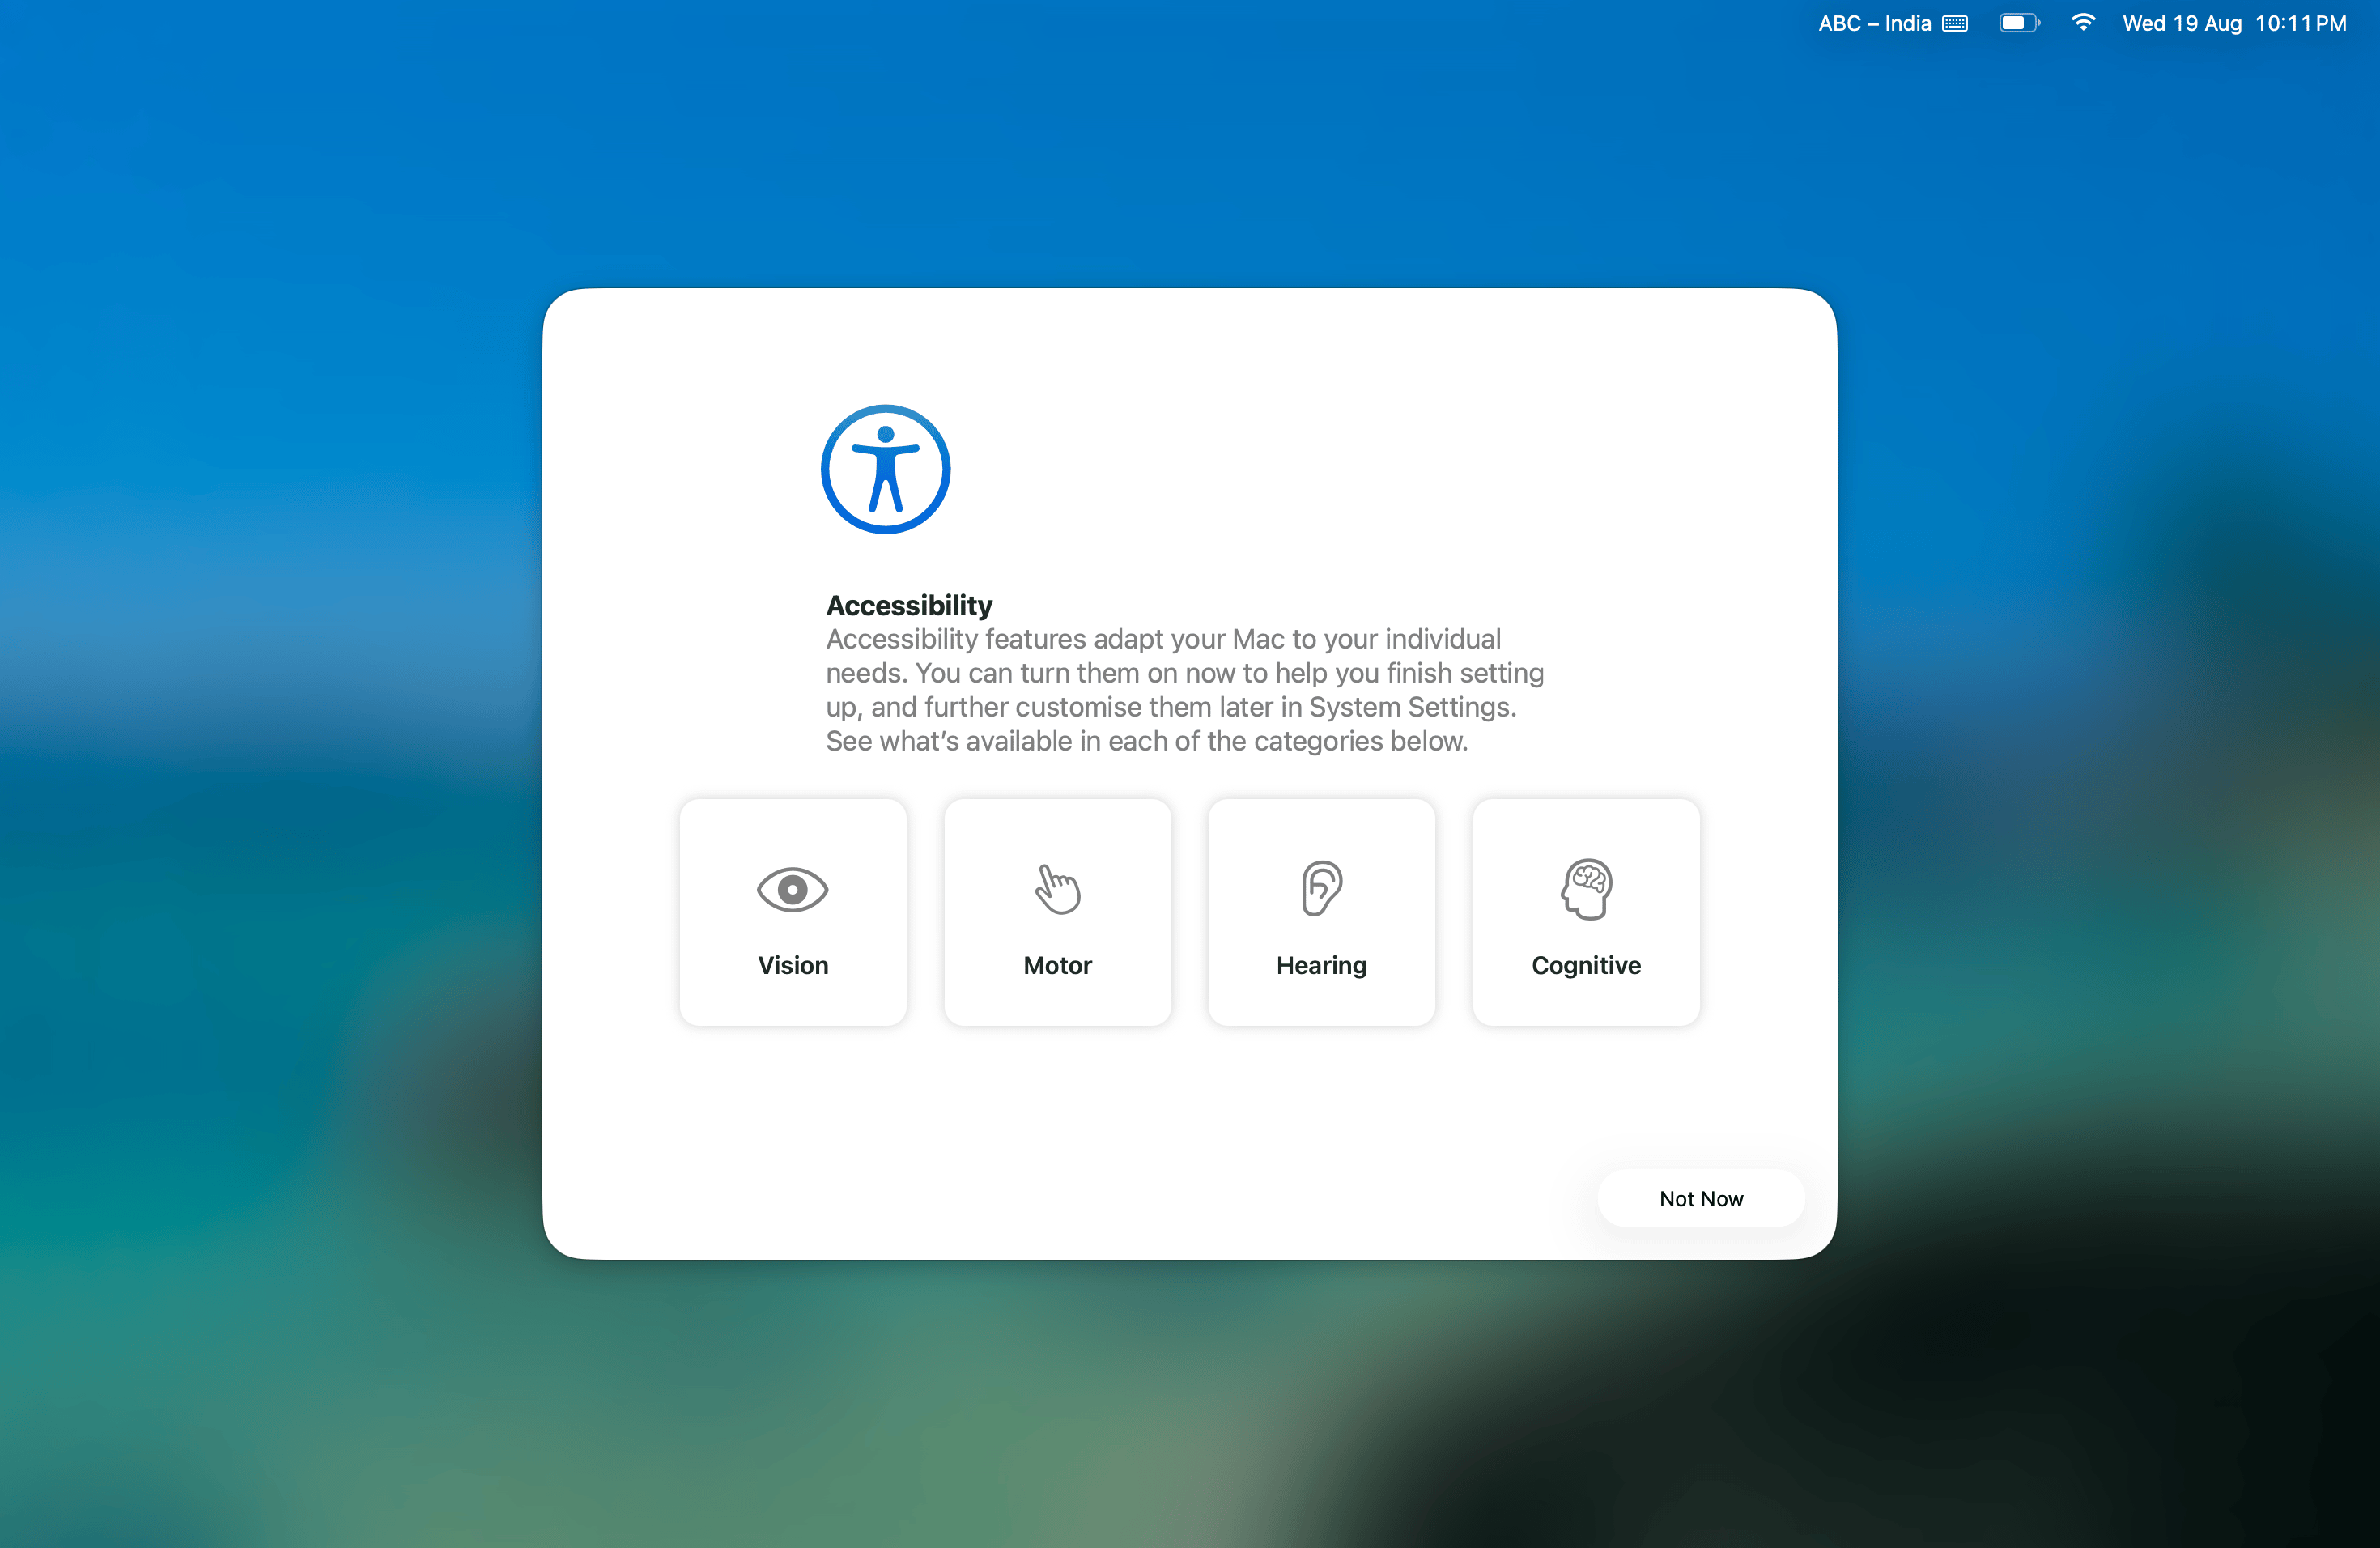
3
Most Important Step
On the Sign In to Your Apple Account screen, sign in with the Apple ID for this line only - never reuse an Apple ID that’s already signed into another profile on this Mac.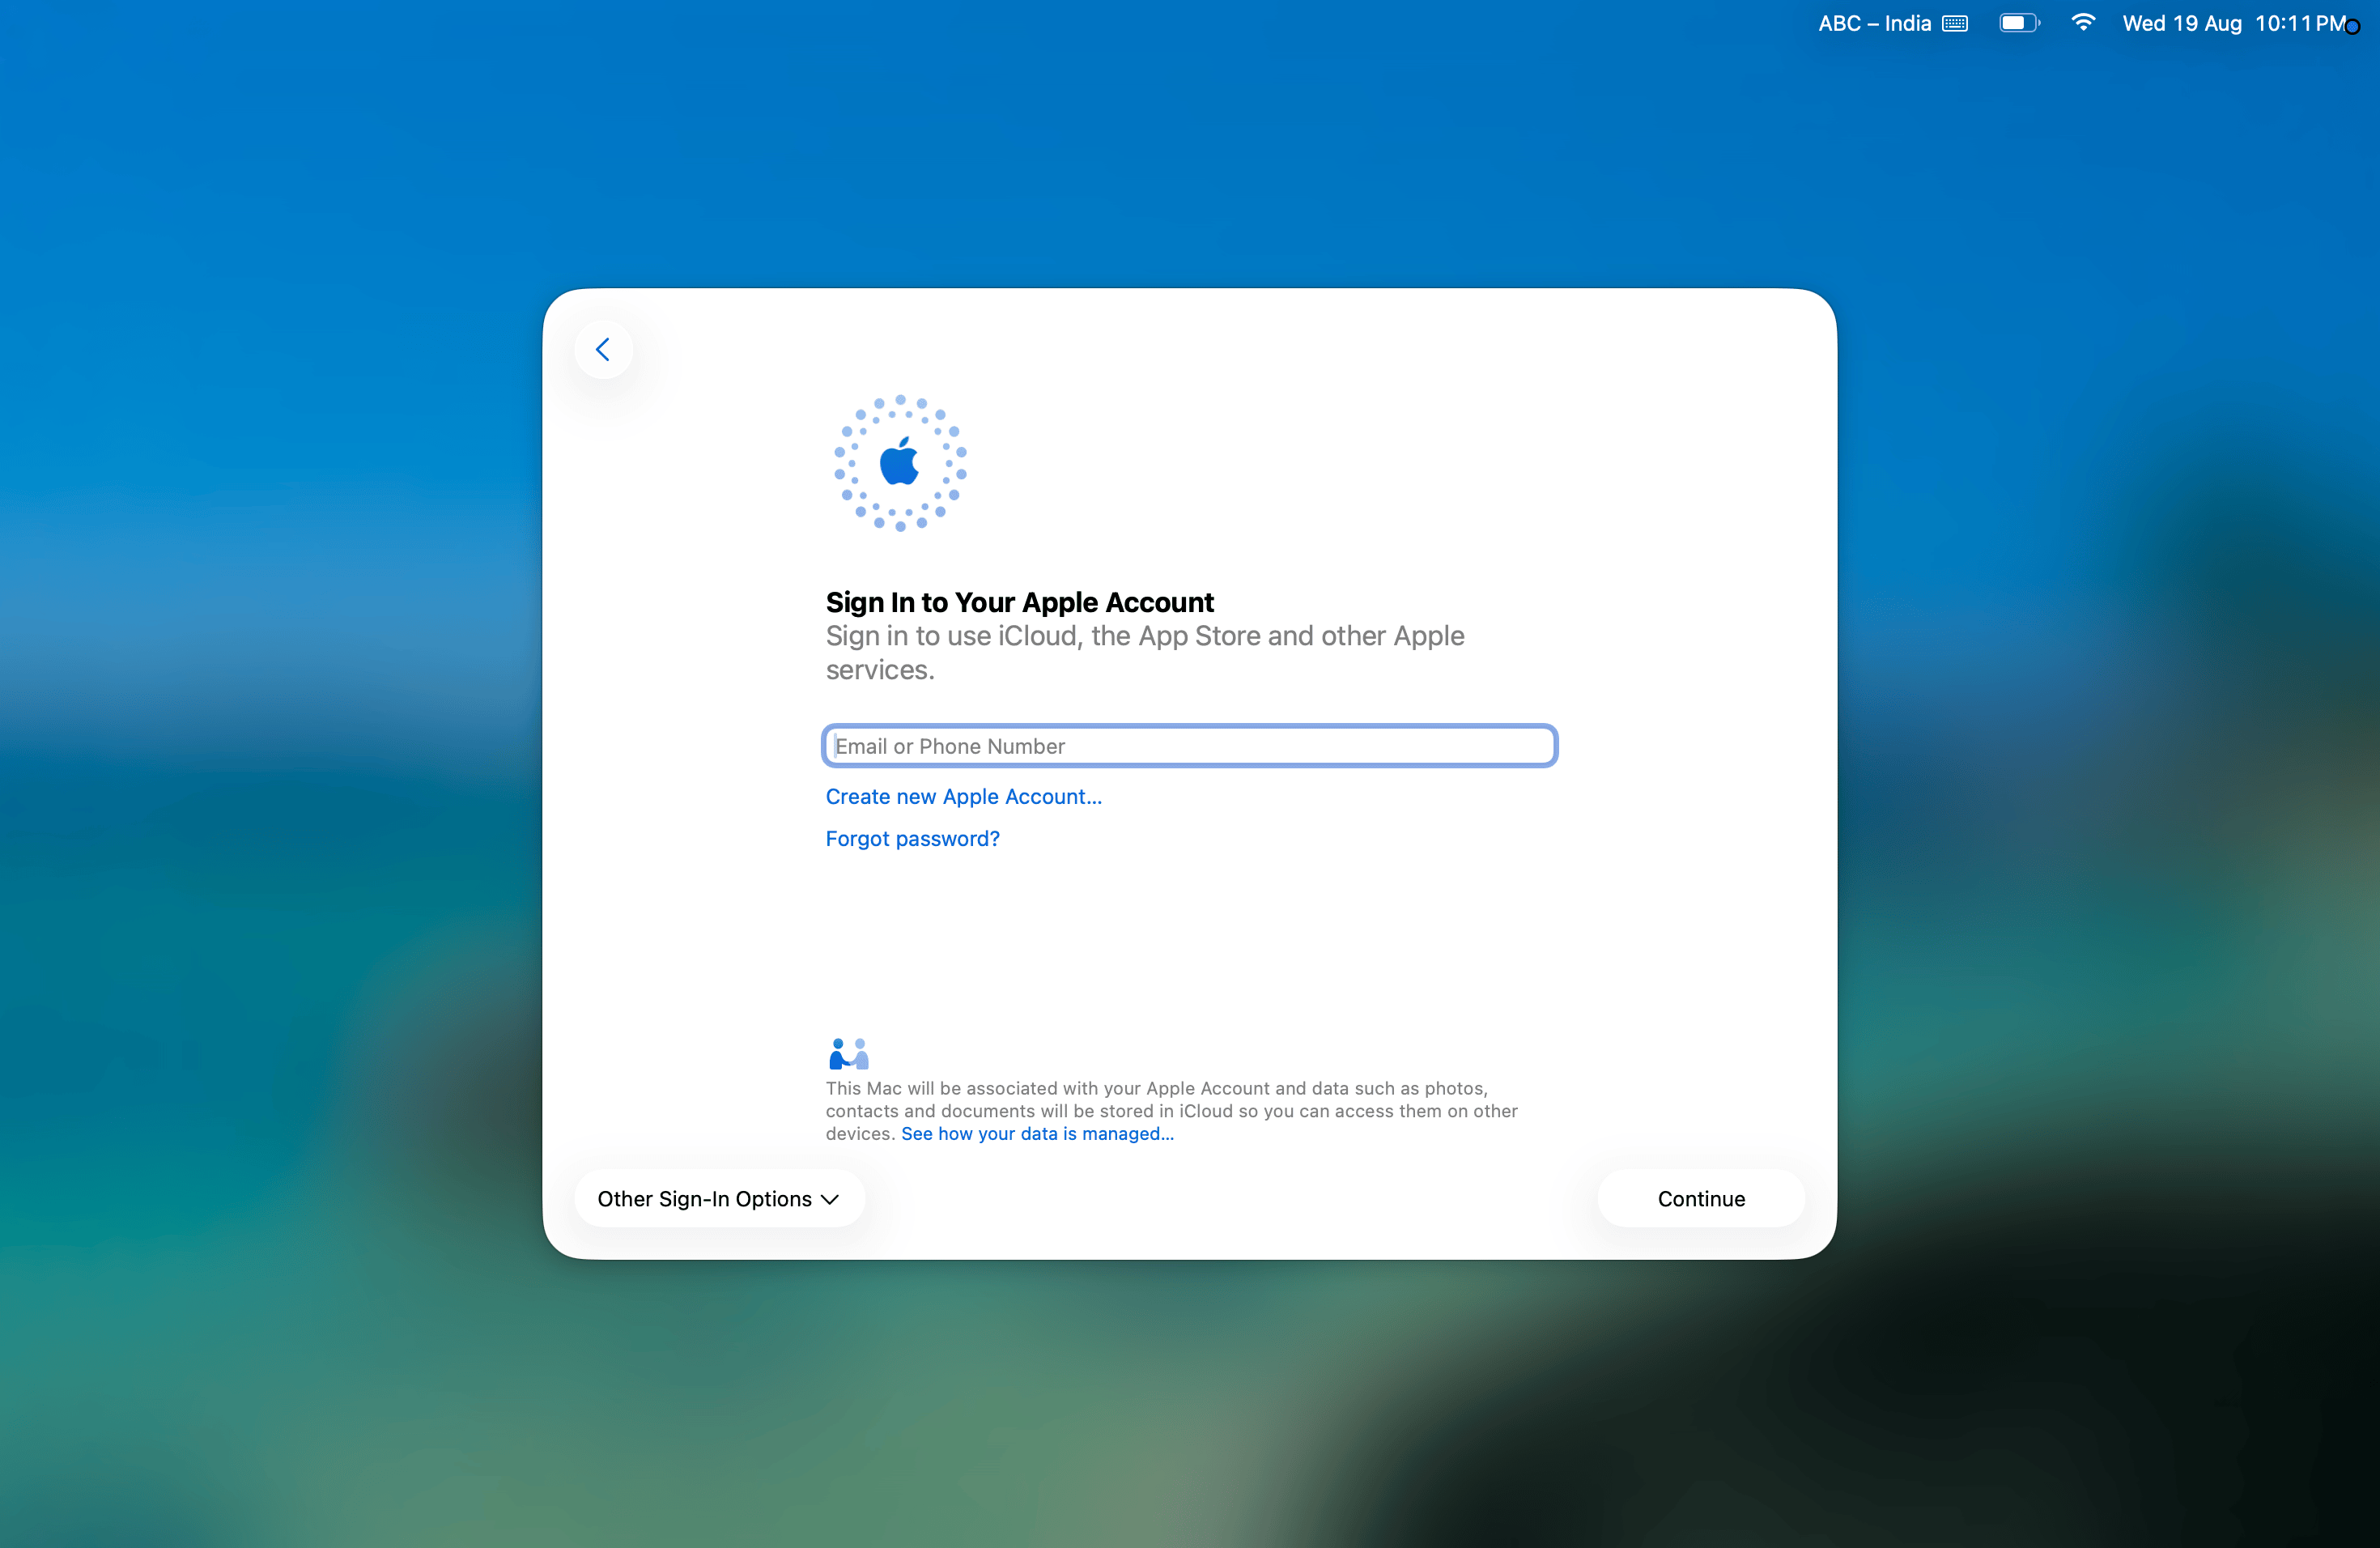
4
On the Choose Your Look screen, pick any appearance and click Continue.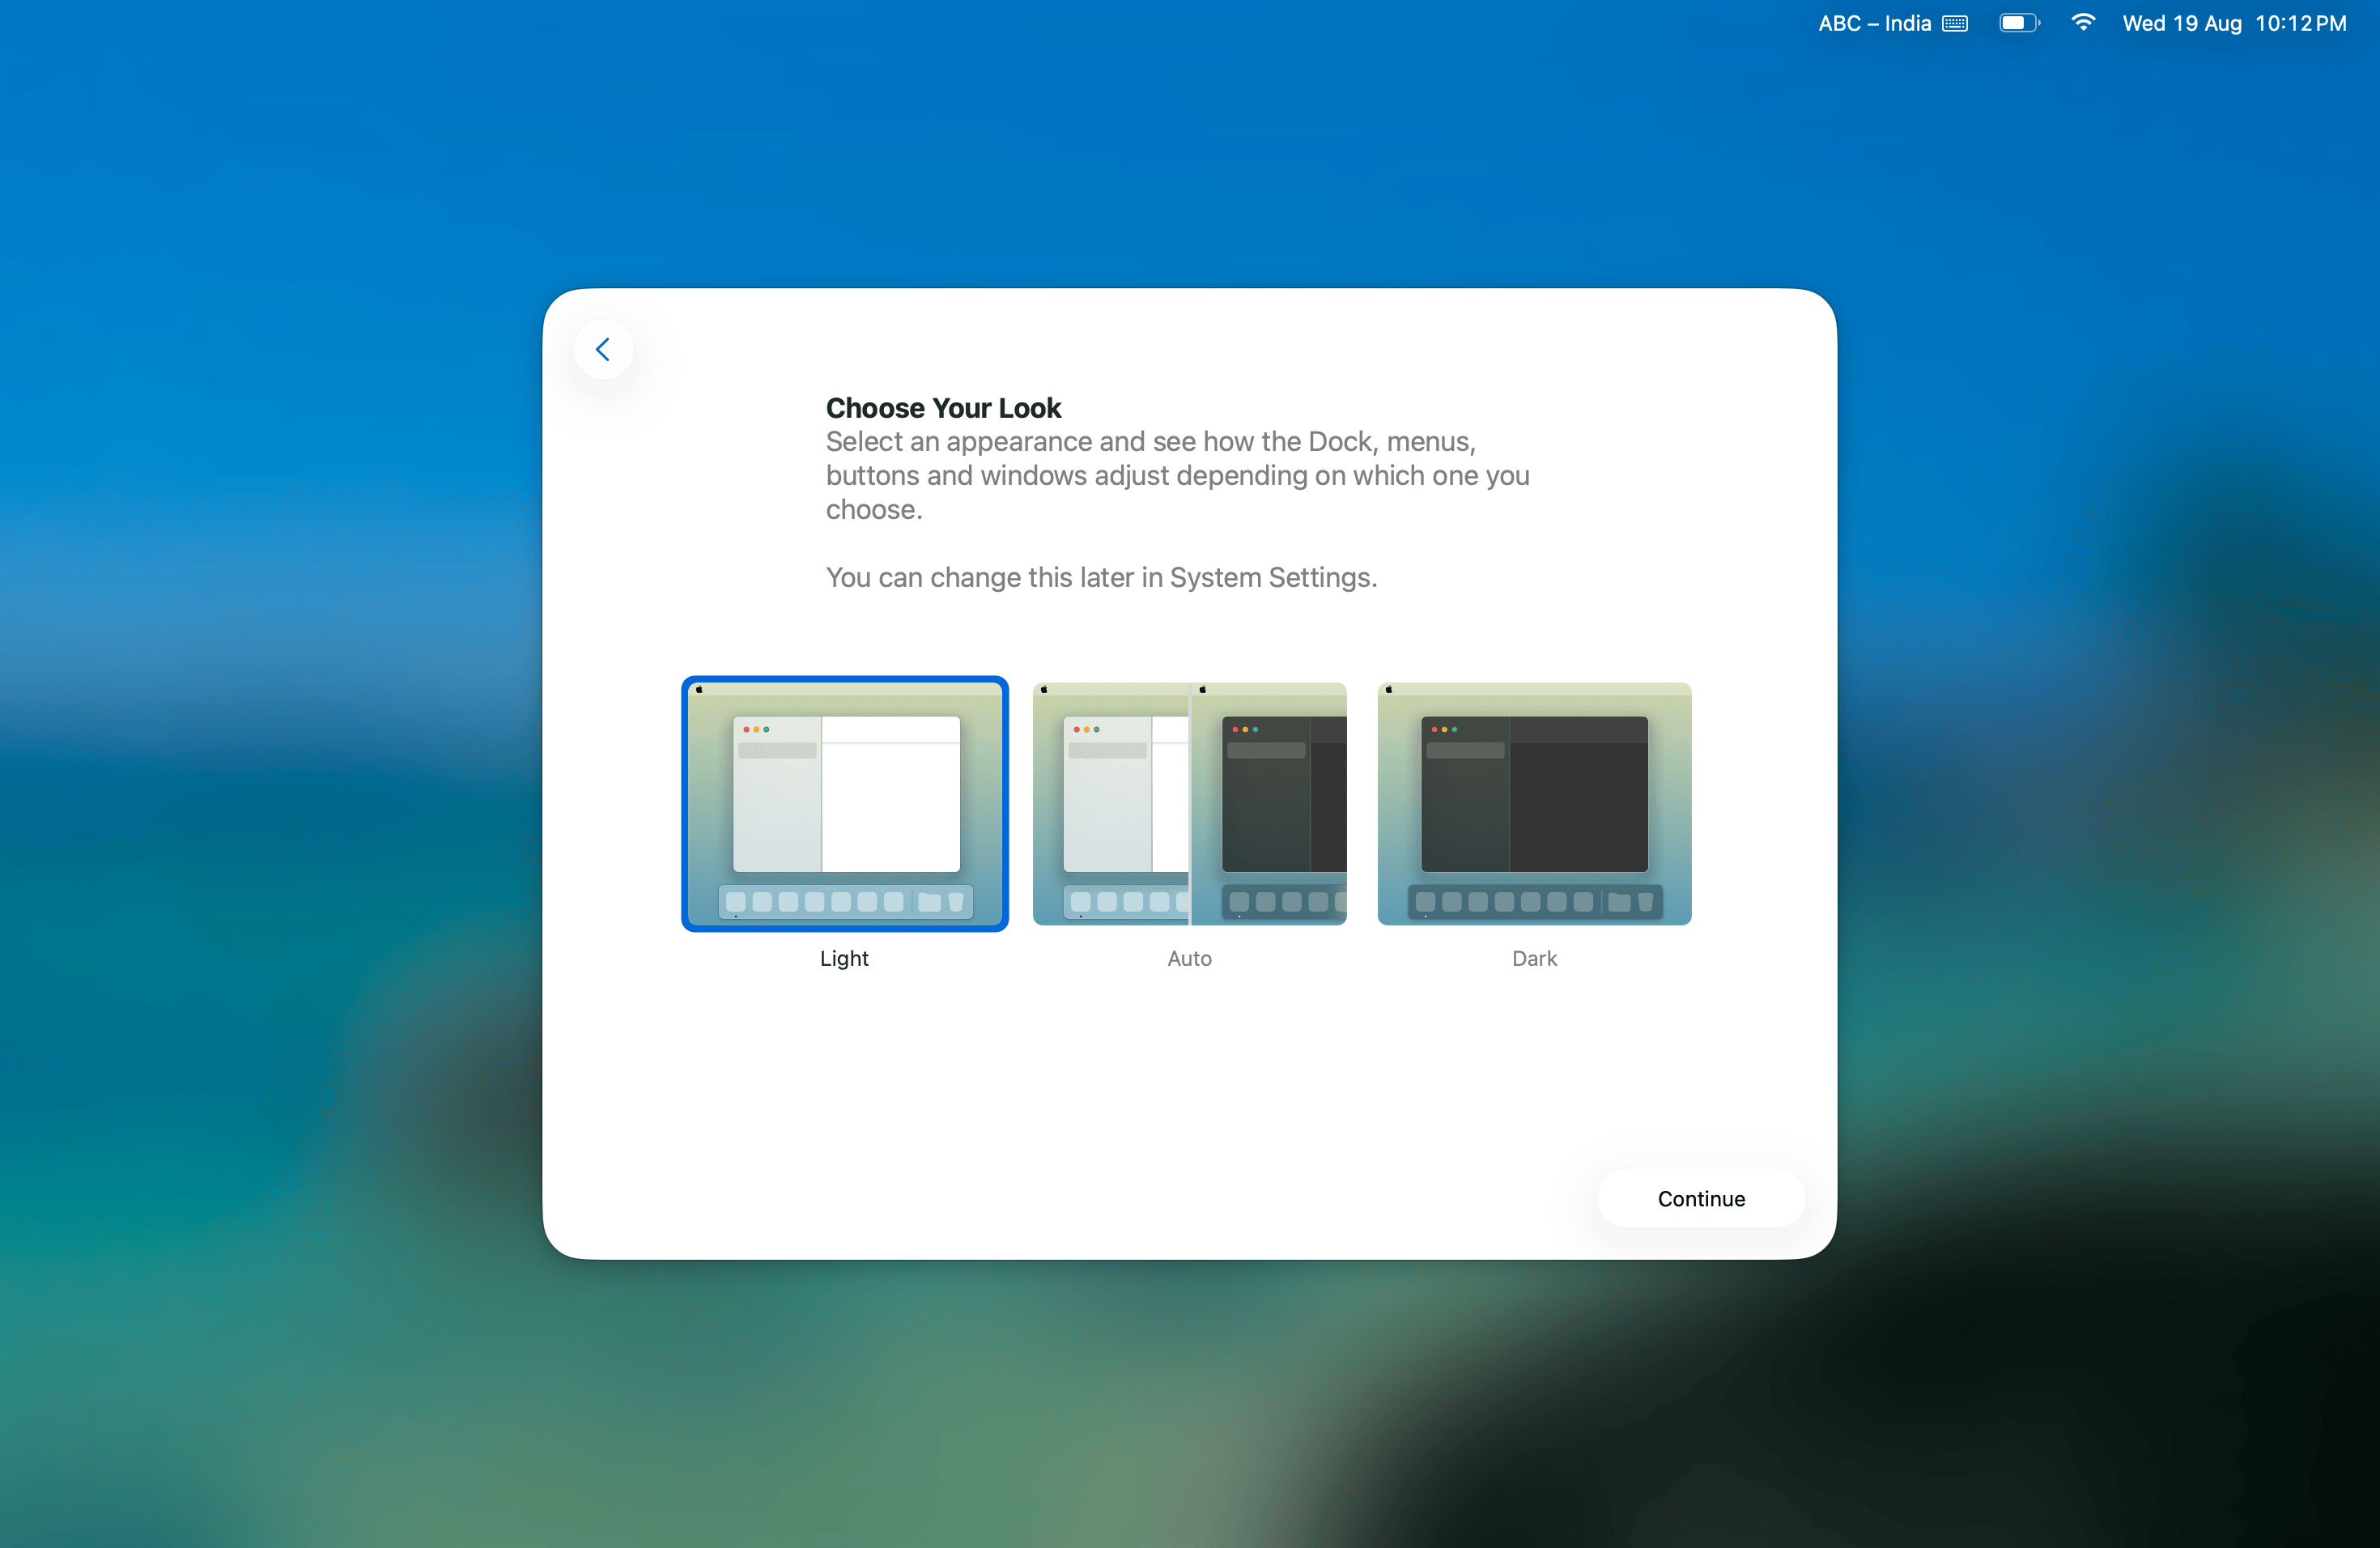
5
Finally, on the welcome screen, click Get Started - the setup assistant is done and you land on the new profile’s desktop.
Every profile you set up appears in the Fast User Switching menu - here all three profiles are ready to run their own line side by side.
Next: Connect Each Profile to Your CRM
Your profiles are ready - now connect the iMessage line inside each one. Switch into a profile and follow the main setup guide from start to finish (configure the Messages app, install the iMessage Sync app, and activate it with that line’s activation code), then repeat inside the next profile.iMessage Full Setup
Complete step-by-step instructions to connect the iMessage line inside each profile - Messages settings, Sync app installation, and activation.
Step 4: Switch Between Profiles
Once everything is set up, moving between profiles takes two clicks:1
Click the Fast User Switching icon (or user name) in the top-right menu bar.
2
Select the profile you want to open.
3
Enter that profile’s password. You land exactly where you left off - apps still open, sync app still running.
Running All Profiles in Parallel
This is the key concept: with Fast User Switching, a profile you switch away from stays logged in, and its apps keep running in the background. That means every line keeps sending and receiving messages no matter which profile is currently on screen. To get all lines online:1
Log into profile 1, make sure the iMessage Sync app is open and connected.
2
Use Fast User Switching to move to profile 2 - do not log out of profile 1.
3
Open the sync app there too, then continue through each remaining profile the same way.
4
Verify in your CRM that every instance shows as connected at the same time.
All profiles are now running in parallel. Messages for any line are delivered instantly, regardless of which profile is in the foreground.
Keep the Mac (and Every Profile) Awake
A sleeping Mac takes all profiles offline at once, so sleep prevention matters even more than with a single line:- In System Settings → Energy (or Displays → Advanced), enable Prevent automatic sleeping when the display is off and turn off Power Nap.
- Optionally install the free Amphetamine app from the Mac App Store to force the Mac to stay awake.
- On a Cloud Mac this is handled for you - it stays on 24/7.
After a Restart
macOS logs every profile out when the Mac reboots (updates, power loss, manual restart). After any restart:1
Log into each profile one by one and open its iMessage Sync app.
2
Use Fast User Switching between logins so previously opened profiles stay running.
3
Confirm in the CRM that all instances are back online.
Pro tip: in each profile, add the iMessage Sync app to System Settings → General → Login Items so it launches automatically the moment you log that profile in.
Best Practices
- Name profiles after their line (
Client-A-iMessage,Support-Line) so you never activate the wrong code in the wrong profile. - Warm up each Apple ID separately. The 50 unique contacts per day safety limit applies per Apple ID / line, not per Mac.
- Start small. Add profiles one at a time and watch performance; if the Mac gets sluggish, you’ve hit its practical limit - upgrade RAM or move to a bigger Cloud Mac.
- Keep macOS updates deliberate. Apply them at a planned time, since the restart takes all lines offline until you log each profile back in.
Fixing Common Problems
One Instance Shows Offline, the Others Are Fine
Why it happens: That profile was logged out (not switched), its sync app was quit, or the profile was never logged back in after a restart. How to fix it: Use Fast User Switching to enter that profile, open the iMessage Sync app, and confirm the instance reconnects in the CRM.All Instances Went Offline at Once
Why it happens: The Mac went to sleep, restarted, or lost its internet connection. How to fix it: Wake the Mac, check the network, then log into each profile and relaunch its sync app. Re-check your sleep-prevention settings so it doesn’t happen again.The Mac Feels Slow with Several Profiles Running
Why it happens: Each logged-in profile consumes RAM. Too many parallel profiles for the available memory forces macOS to swap and everything crawls. How to fix it: Log out of profiles you don’t actually need running, close unnecessary apps inside each profile (only Messages and the sync app need to run), or move to a Mac with more RAM.For message-level issues (not sending, replies missing), see the general Troubleshooting Guide - the fixes apply inside each profile the same way they do on a single-line Mac.
Support
If you need help setting up multiple Mac profiles:- WhatsApp Support: Chat on WhatsApp
- Email: support@goghl.ai